Suspension Setup for Your Weight and Terrain
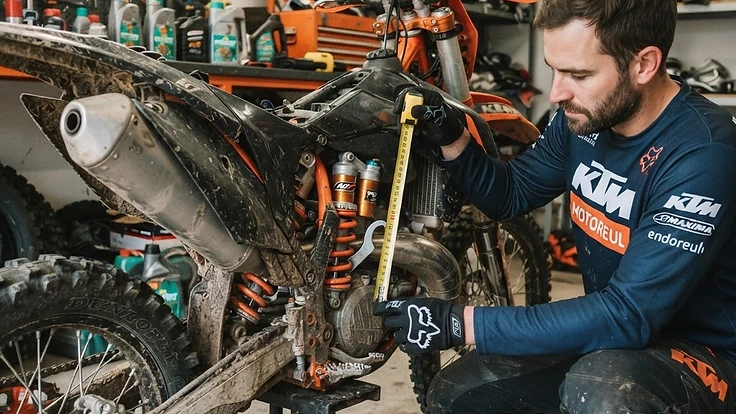
A practical, step-by-step guide to setting up your enduro bike’s suspension for your body weight, speed, and the ground you actually ride on, starting with springs and sag before moving to clickers and terrain-specific changes.
Your suspension does not need magic parts to work well. It needs the right springs, correct sag, and small, deliberate adjustments based on what the bike is doing under you.
If your bike feels harsh, vague, or exhausting to ride, do not start by spinning clickers at random. Set the foundation first, then tune for the terrain you ride most.
Start With Spring Rate, Not Clickers
The biggest mistake riders make is trying to fix a spring-rate problem with damping. If the springs are wrong for your weight, the bike will sit in the wrong part of the stroke and every clicker change becomes a band-aid.
As a rule, set the bike up for your ready-to-ride weight: you in full gear, hydration pack, tools, and whatever you normally carry. That can add 10-20 lb more than your bodyweight alone.
Use this simple check:
- Find the stock spring recommendations for your bike.
- Compare them to your ready-to-ride weight.
- If you are well outside the stock target range, change springs before doing anything else.
Typical clues your springs are wrong:
- Too soft: excessive dive under braking, rear squats and steers wide, bottoms too easily, feels low and lazy.
- Too stiff: deflects off rocks and roots, rides high, lacks traction, feels nervous and skips instead of settling.
On most enduro bikes, getting the rear spring right makes the biggest immediate difference. The fork matters too, but a badly mismatched shock spring can make the whole bike feel wrong.
Measure and Set Sag
Sag tells you where the bike sits in the stroke with your weight on it. This is the first real setup number to chase.
You need:
- A tape measure
- A stand
- A marker or piece of tape
- A helper
Step 1: Measure topped-out length
Put the bike on a stand so the rear wheel is off the ground. Measure from the rear axle vertically to a fixed point on the fender or side panel. Mark that point so you use the same spot every time.
Step 2: Measure static sag
Take the bike off the stand and let it rest under its own weight. Bounce it lightly and let it settle. Measure again.
Static sag = topped-out length minus bike-only length
Step 3: Measure race sag
Now get on the bike in full gear, standing in a neutral riding position with your feet on the pegs. Have your helper steady the bike, bounce it lightly, and let it settle. Measure again.
Race sag = topped-out length minus rider-on-bike length
Rear sag targets for enduro
A solid starting point for most enduro bikes is:
- Race sag: 105-115 mm
- Static sag: 30-40 mm
What the numbers mean:
- If race sag is correct but static sag is very low, the spring is likely too soft.
- If race sag is correct but static sag is very high, the spring is likely too stiff.
Adjust preload until race sag is in range. If you need a lot of preload or the static sag ends up far out of range, stop and fit the correct spring.
Set a Baseline Before You Test
Once spring rate and sag are close, set the damping adjusters to a known baseline.
- Turn each clicker in gently until it seats. Do not force it.
- Count the clicks back out to the manufacturer’s standard setting.
- Write the settings down.
On a modern enduro bike, you may have:
- Fork compression
- Fork rebound
- Shock low-speed compression
- Shock high-speed compression
- Shock rebound
If you do not know what each adjuster does, keep it simple:
- Compression controls how fast the suspension compresses.
- Rebound controls how fast it extends after being compressed.
- Low-speed damping mostly affects chassis movement: braking, accelerating, turning, weight transfer.
- High-speed damping mostly affects sharp hits: rocks, roots, square edges, landings.
Test in a Short Loop, One Change at a Time
Do not tune on memory alone. Build a short test loop with the stuff you actually ride: braking bumps, roots, rocks, a climb, a turn, maybe one bigger hit.
Then tune like this:
- Ride the loop at normal pace.
- Identify one problem only.
- Change one adjuster by 1-2 clicks, or one small step on the high-speed adjuster.
- Ride the same loop again.
- Keep notes.
Examples:
- Front end deflects off roots and rocks: soften fork compression 1-2 clicks.
- Fork dives too much under braking: add 1-2 clicks of compression.
- Rear kicks sideways off square edges: slow shock rebound slightly.
- Rear feels dead and packs down through repeated hits: speed shock rebound up slightly.
“Packing” matters in hard enduro. If rebound is too slow, the suspension does not recover between repeated bumps. The bike rides lower and lower, then feels harsh and busy. If rebound is too fast, it will pogo, kick, or feel loose.
Tune for Your Weight and Speed
Two riders of the same weight may still want different settings. A smoother rider who carries less speed into impacts usually needs less damping than an aggressive rider who hits everything harder.
Use your pace honestly:
- If you ride technical singletrack at moderate speed, start softer.
- If you ride faster special-test style terrain, whoops, or bigger impacts, you may need more support.
Make changes in this order:
- Correct springs
- Correct sag
- Rebound
- Compression
That order matters because rebound controls stability and recovery. Once the bike returns properly after impacts, compression changes are easier to feel and judge.
Tune for Terrain
You do not need a different suspension setup for every ride, but you should know how to bias your setup.
Rocks, roots, and slick technical ground
You want traction, compliance, and less deflection.
- Run slightly softer compression, especially in the fork.
- Avoid overly fast rebound; the wheels should follow the ground, not spring off it.
- Do not set the bike too high in the stroke or it will skate and feel nervous.
Fast chop, whoops, and sand
You want support and control deeper in the stroke.
- Add a little compression front and rear.
- If the rear wallows or swaps, slow rebound slightly.
- If the fork rides too low and knife-dives, add compression or raise fork oil only if you know what you are doing.
Hardpack and flat corners
You want a settled chassis with front-end confidence.
- If the bike pushes the front, check rear sag first.
- Too much rear sag can unload the front and make it understeer.
- Small low-speed compression changes can help chassis attitude more than big clicker swings.
Steep climbs and descents
Balance matters more than outright plushness.
- If the bike squats and loses steering on climbs, check spring rate and race sag before adding lots of compression.
- If it dives and feels vague on descents, add a touch of fork compression or reduce rear ride height if it is too tall.
Common Mistakes
- Changing five things at once, then having no idea what helped
- Running the wrong spring rate and trying to fix it with clickers
- Setting sag without full riding gear and pack
- Counting clicks from wherever the adjuster happened to be instead of from fully seated
- Going too stiff because “firm” feels impressive in the parking lot
- Ignoring rebound, even though rebound problems often feel like harshness
- Testing on random trail sections instead of a repeatable loop
- Chasing perfect plushness and ending up with a bike that blows through the stroke
- Copying another rider’s settings without matching their weight, pace, or terrain
- Forgetting to write settings down
What Good Looks Like
A good setup feels calm, predictable, and easy to trust. The front tire tracks instead of pinging away from every root, the rear wheel drives forward instead of kicking, and the bike stays balanced when you brake, turn, climb, and drop into rough descents.
You should not feel like the bike is fighting you. It should ride high enough to keep support, soft enough to find traction, and controlled enough that repeated hits do not turn into chaos. When your suspension is right for your weight and terrain, you use less energy, make fewer mistakes, and can ride technical ground faster with less drama.
Keep Reading


Join the Enduro University community
Create a free account to comment on this article, make race predictions, play daily trivia, build your virtual garage, enter the photo contest and climb the leaderboards.
Related Stories




Comments (0)
Be the first to comment.