Reading Ruts and Choosing Your Line
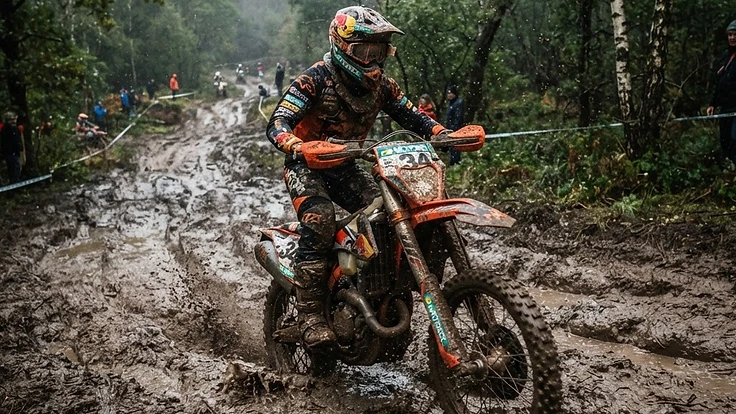
A complete, practical guide to understanding ruts, evaluating traction, and choosing lines in enduro and hard enduro terrain. It explains what different rut shapes mean, how to scan an obstacle, when to commit or bail out, and how body position, throttle, clutch, and vision all work together to keep you moving forward.
Ruts are not just damage in the trail. They are information. If you learn to read them before you drop your front wheel in, you stop reacting late and start making deliberate line choices that save energy, preserve momentum, and keep you off the ground.
Why Ruts Matter
In enduro and hard enduro, a rut changes everything: your steering, your braking, your available traction, and your options if the bike starts to get offline. A rut can help you like a berm, trap you like a rail, or spit you out if you enter it wrong. The same hill, corner, or off-camber can ride easy or feel impossible depending on whether you chose the right rut or avoided the wrong one.
Your job is not just to see that a rut exists. Your job is to understand what it will do to the bike. That means reading depth, width, moisture, entry angle, exit options, and what the riders before you have already proven. If you can do that quickly, you ride with less panic and fewer surprise corrections.
First, Understand What a Rut Is Telling You
A rut is a record of repeated tire passes under specific conditions. It tells you where other bikes found traction, where they lost it, where they braked, where they spun, and where they got deflected.
When you look at a rut, ask yourself these basic questions:
-
How deep is it? A shallow rut may guide the bike lightly and still allow you to steer out. A deep rut can lock both wheels into one path. Deep ruts can be useful, but only if the line is good all the way through.
-
How wide is it? A narrow rut can catch and hold a front wheel. A wider rut may let the tire move around and hunt. If the rut is wider than your tire and loose inside, the front can knife unpredictably.
-
What is the soil doing? Dark wet soil may be greasy with poor side grip. Freshly exposed loam can offer bite. Hard-packed polished clay is often the worst because it looks solid but gives very little lateral support.
-
Is it smooth or choppy? A smooth rut lets the bike settle. A choppy rut with roots, holes, braking bumps, or embedded rocks can unload the tires and force you to fight the bars.
-
Where does it start and where does it end? Many riders only inspect the middle. That is a mistake. The entry decides whether you get into the rut cleanly. The exit decides whether the rut is actually worth taking.
-
What put the rut there? Was it made under acceleration on a hill? Under braking into a turn? On an off-camber where bikes slid downhill? The cause usually predicts how the bike will behave if you follow it.
Build a Fast Trail-Side Scan
You will not always have time to stop and inspect. You need a repeatable scan that works while rolling in.
Use this order:
1. Look far enough ahead to see the whole problem
Do not stare at the first groove in the dirt. Pick your head up and read the full section: approach, main obstacle, and exit. A rut that looks bad at the start might lead to clean traction at the top. A rut that looks inviting might end in a stump, a square edge, or a dead stop.
2. Find the traction zones
Look for places where the tire can drive forward instead of just spinning. Traction zones are often:
- exposed dirt with texture
- edges of roots rather than polished tops
- embedded rocks with dry surfaces
- grass or undisturbed ground beside the main rut
- the outside wall of a rut that can support the tire
3. Identify commitment points
Ask yourself: at what point am I committed to this line? On a steep climb, that point may be the moment you enter the rut. In a corner, it may be the moment the front loads into the groove. Know where you can still change your mind and where you cannot.
4. Find escape options
Good riders always know how they will bail out if the line fails. That may mean crossing into the next rut early, standing the bike up and driving out, or stopping on a shoulder before the section gets worse. If there is no escape, your entry and speed need to be more precise.
How to Read Different Types of Ruts
Flat-Turn Ruts
In a flat corner, the rut usually forms where riders brake late, turn sharply, and apply throttle too soon. Here you want to know whether the rut supports lean or whether it is just a polished trench.
A good flat-turn rut has:
- a clear entry without a sharp square edge
- enough depth to guide the tire
- sidewalls that support the front
- an exit that lets you stand the bike up and drive
A bad flat-turn rut has:
- braking holes at the entry
- a glazed bottom with no bite
- multiple crossing ruts that grab the front
- an exit that points too tight and forces more turning than you want
If the rut is good, commit your front wheel to it and let it hold the bike while you stay balanced over the pegs. If it is slick and vague, you may be better off taking a wider, flatter line with less lean and more controlled drive.
Hillclimb Ruts
On climbs, ruts show where traction was found and lost. A hill rut often starts with drive, gets deeper where bikes spin, then becomes chopped up where riders dab and stall.
Read these details:
- Fresh sharp edges often mean recent successful traffic.
- Loose piles in the bottom mean wheelspin and bogging.
- Big holes between roots or rocks mean riders lost momentum there.
- A rut that hooks toward a root or ledge will cost drive at exactly the wrong time.
If the rut points straight to your target and has a clean top-out, it is often worth using. If it zigzags, deepens midway, or ends in a hole under the crest, you may be better taking a cleaner edge line even if traction looks less obvious.
Off-Camber Ruts
These are dangerous because gravity is constantly pulling the bike down the slope. In off-camber terrain, a rut can either save you by giving the tires a wall to press against or trap you and drag you downhill.
Look for whether the rut is:
- running across the slope with support on the downhill side
- cutting diagonally downhill and forcing the bike to slide
- full of wet leaves, roots, or polished clay
- interrupted by steps or rocks that will unsettle the chassis
On an off-camber, the best line is often not the deepest rut. It is the line that lets the tires stay loaded evenly and keeps the bike from dropping off the support edge.
Braking Ruts
These form before corners, drop-ins, and ledges. They are often deep and ugly because riders enter them with weight forward and less control.
A braking rut is useful if it channels the bike in a straight, predictable way. It is harmful if it gets so deep that you cannot release the brakes and reset your body before the turn or obstacle. If you need to change direction after the rut, make sure the line gives you time to do it.
Choose the Line, Then Ride It With Purpose
Once you choose a line, stop half-choosing it. Most crashes in ruts come from hesitation: front wheel here, rear wheel somewhere else, body stiff, eyes down, and a last-second attempt to switch plans.
Follow this sequence:
1. Set your entry angle early
You want both wheels approaching the rut in a way that lets them enter cleanly. Too shallow and the front wanders along the edge before dropping in unpredictably. Too steep and you slam the sidewall and deflect.
Aim to meet the rut with a calm, deliberate angle. Let the bike settle before the technical part starts.
2. Get neutral on the bike
Stand with your weight centered and light through the hands. On climbs, bias slightly forward enough to keep the front honest without killing rear traction. In flat turns, let the bike lean under you while you stay balanced over the pegs.
If you are tense in the bars, the front will follow every twitch. Let the chassis work.
3. Keep your eyes on the exit, not the trench
Your front wheel will go where your eyes and body tell it to go. If you stare into the deepest part of the rut, you ride reactively and miss the next decision. Look through the rut to the point where you want to come out or apply drive.
4. Use smooth throttle and clutch
A rut rewards smoothness. Abrupt throttle spins the rear and deepens the groove under you. Chopping the throttle unloads the bike and makes the front vague. Feed power in so the rear tire drives without exploding the line.
In hard enduro terrain, clutch control is what keeps the bike settled. Use enough slip to maintain traction and rpm without a violent hit.
5. Let the rut do some of the steering
If you have chosen a supportive rut, trust it. You do not need to wrestle the front wheel constantly. Guide the bike, but do not overcorrect every movement. Small corrections work. Big panic inputs usually make the tire climb the wall and pop out at the worst moment.
6. Finish the line cleanly
Many riders survive the middle and crash at the exit. As the rut ends, be ready for the bike to regain freedom of movement. Stand the bike up, square your shoulders, and drive to the next traction zone. Do not stay stuck in rut mode after the rut is over.
When to Avoid the Rut Entirely
Sometimes the smartest line is not in the rut at all.
Avoid the rut when:
- it is deeper than the benefit it gives
- the bottom is polished and the sidewalls are collapsing
- it ends in a hole, stump, or crossed line
- it forces a bad body position for the next obstacle
- the edge line offers cleaner traction with a controllable exit
In hard enduro, the untouched line beside the main rut is often slower-looking but easier because it preserves steering freedom and costs less energy. Do not choose a rut just because everyone else did.
Step-by-Step Drill to Practice Reading Ruts
You can train this skill deliberately.
Drill 1: Stop and predict
On a practice trail, stop before a rutted corner or hill. Study three possible lines. For each one, say out loud:
- where you will enter
- where traction should be best
- what the front wheel will do
- what the rear wheel will do
- where you can escape if it goes wrong
Then ride one line and compare what actually happened. This builds pattern recognition fast.
Drill 2: Ride the same rut three ways
Choose a safe rut and repeat it with:
- too much speed
- too little speed
- correct speed
Feel how entry speed changes everything: stability, steering effort, and traction. This teaches you that line choice and speed choice cannot be separated.
Drill 3: Practice exits
Find a rut with a clear finish. Focus only on the last third. Ride it repeatedly and practice looking up, releasing the bars, and driving out cleanly. Strong exits reduce most of the fear riders feel in ruts.
Common Mistakes
- Looking straight down into the rut instead of through it.
- Choosing the deepest rut because it looks committed, even when it has no clean exit.
- Entering at the wrong angle and letting the front wheel slap into the sidewall.
- Sitting too early and getting pulled around by the bars.
- Death-gripping the bike and overcorrecting every movement.
- Chopping the throttle when the bike wiggles, which unloads the chassis and makes traction worse.
- Spinning the rear aggressively and digging the bike deeper.
- Failing to inspect what happens at the top of the hill, not just at the bottom.
- Following another rider's line without checking whether your speed, skill, and bike position match what that line needs.
- Waiting too long to commit, then half-entering one rut while aiming for another.
- Ignoring escape options and getting trapped in a line that was obviously deteriorating.
- Treating all mud ruts the same; some have supportive edges, others are just grease trenches.
Adjust for Conditions
Dry loam usually gives you forgiving side grip and better braking. Wet clay usually gives you almost none. Sand ruts can feel stable until the front plows. Rocky ruts punish bad timing more than bad line choice because impacts deflect the wheels.
In wet conditions, prioritize smoothness and support over the shortest path. In dry rough conditions, prioritize a line that keeps the bike calm through impacts. In deep mud, sometimes the best line is the least-used one because it still has shape and structure.
Also factor in fatigue. Late in a race or long ride, choose lines that demand less precision and less clutch abuse. A theoretically faster rut is a bad line if you are too tired to execute it cleanly.
What Good Looks Like
You approach the section already knowing your line, your entry angle, and where you want to exit. Your eyes stay up. The front wheel drops in cleanly without a fight, the bike settles instead of pinging side to side, and your hands stay light because you are letting the rut guide rather than trying to overpower it.
You feel the tires load predictably. The rear drives instead of trenching. Small body adjustments are enough. You are not making emergency saves every second because the line choice did the hard part before the bike even entered the rut.
At the exit, you come out balanced and ready for the next obstacle, not lucky to still be upright. That is what good rut reading feels like: less drama, less wasted energy, and a bike that goes where you expected it to go.
Keep Reading


Join the Enduro University community
Create a free account to comment on this article, make race predictions, play daily trivia, build your virtual garage, enter the photo contest and climb the leaderboards.
Related Stories



Comments (0)
Be the first to comment.