Beating Arm Pump: Causes, Prevention and Training
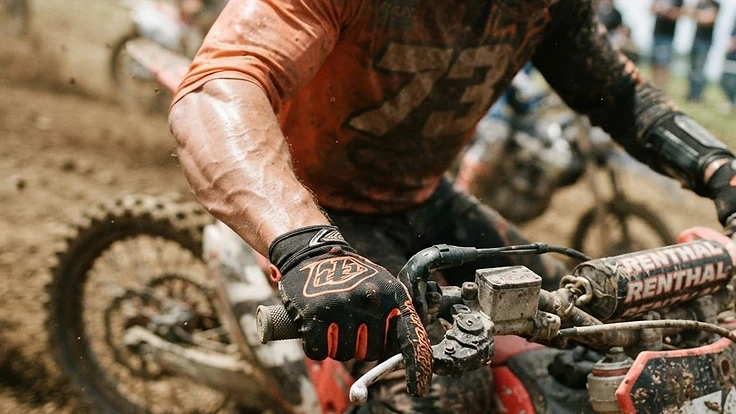
A complete, practical guide to understanding why arm pump happens in enduro riding, how to prevent it with bike setup and technique, and how to train your body so you can ride longer with less pain and more control.
Beating Arm Pump: Causes, Prevention and Training
Arm pump can ruin a ride faster than almost anything else. One minute you are in control, the next your hands are numb, your forearms feel like concrete, and you are hanging on instead of riding. The good news is that arm pump is rarely one single problem. In most riders, it is a stack of fixable causes: setup, technique, tension, fitness, and pacing.
What Arm Pump Actually Is
Arm pump is the swelling and pressure you feel in your forearms when the muscles work harder than they can recover. In enduro and hard enduro, your forearms are constantly gripping, stabilizing, braking, clutching, absorbing hits, and reacting to mistakes. When blood flow and muscle pressure get out of balance, the forearm tightens, your fingers stop working properly, and control drops fast.
You need to understand one thing clearly: arm pump is usually not caused by weak hands alone. More often, it comes from riding with too much tension, bad body position, poor breathing, controls that do not fit you, and trying to solve every obstacle by hanging on harder.
Why Enduro Riders Get It
In hard enduro, the terrain loads your upper body in a brutal, repetitive way. Rocks deflect the front wheel. Steep climbs make you pull. Off-camber turns make you death-grip the bars. Slow technical riding means less airflow, higher heart rate, and more full-body tension.
The most common chain looks like this:
- You enter technical terrain already tense.
- You grip the bars too hard.
- Your elbows and shoulders stiffen.
- The bike starts bouncing underneath you instead of moving freely.
- Every hit now goes into your hands and forearms.
- Your breathing gets shallow.
- Your heart rate climbs and your forearms tighten even more.
That loop is why arm pump can feel sudden even when it has been building for twenty minutes.
Fix the Bike Before You Blame Your Body
If your controls fight you, your forearms pay for it. Start here before you change training.
1. Set your levers correctly
Your clutch and front brake levers should allow a straight line from your forearm through your hand when you are standing in attack position. If the levers are too high, you will cock your wrists upward and load the forearm badly. If they are too low, you will overreach and lose strength.
A good starting point:
- Stand on the pegs.
- Bend slightly at the hips.
- Put one finger or two fingers on the levers, however you actually ride.
- Rotate the levers until your wrist stays neutral, not bent.
2. Check lever pull and reach
If the clutch is heavy, you are doing extra work every minute. Adjust reach so you can cover the controls without stretching your fingers. If your bike has a hydraulic clutch or adjustable controls, use them properly. Small gains here matter a lot over a long ride.
3. Bar position matters
Do not roll the bars into a weird position just to feel aggressive in the paddock. In enduro, you need a neutral standing position that lets the front wheel move without dragging you forward. Start with the bars in a natural position and make small changes only.
4. Get the suspension in the ballpark
Harsh suspension sends impact straight into your hands. If the front end deflects on roots and square edges, you will grip harder to compensate. Set sag correctly, make sure spring rates suit your weight, and soften overly harsh clicker settings if the bike feels nervous in chop.
5. Use the right grips and bar diameter
Grips that are too hard, too thin, or worn smooth force you to squeeze harder. Choose grips you can hold lightly while still feeling secure. Do not ignore simple comfort items. Enduro is long.
Change Your Riding Technique
Technique is the biggest long-term fix. Good riders do not have magic forearms. They waste less energy.
1. Hold the bike with your lower body
Your legs should do more of the anchoring than your hands. Squeeze the bike lightly with your knees when needed, especially on downhills, braking bumps, and rough climbs. Weight the pegs. Let your feet and legs support your body so your hands can guide instead of cling.
2. Relax your hands on purpose
Most riders think they are relaxed when they are not. On easy trail, do a quick check every thirty seconds:
- Can you wiggle your fingers?
- Are your thumbs crushing the grips?
- Are your shoulders up around your ears?
If yes, reset. Open your fingers for a split second on safe sections. Drop your shoulders. Exhale.
3. Keep a neutral wrist
A bent wrist makes your forearm work constantly. Try to keep your wrists straight whether seated or standing. This becomes especially important on climbs and when covering the clutch.
4. Let the bike move under you
In hard enduro, the bike must dance. If you try to make it hold a perfectly rigid line through rocks, you will fight every impact. Stay balanced over the pegs and allow small movements at the bars. Guide the front wheel. Do not strangle it.
5. Brake earlier, lighter, and straighter
Late braking creates panic and a death grip. In technical riding, smoothness is cheaper than aggression. Get your speed under control sooner so you can enter sections loose and ready, not braced and overloaded.
6. Breathe on purpose
When a climb or nasty section appears, most riders stop breathing properly. That raises tension immediately. Use a simple rule: exhale as you enter the hard part. One deliberate exhale often unlocks your shoulders, grip, and jaw.
A Step-by-Step Warm-Up Before You Ride
Do not go straight from van seat to full attack. A short warm-up makes a real difference.
1. Raise body temperature for 3 to 5 minutes
Walk briskly, do light jogging, or spin on a bicycle. You just want warm muscles and a slightly elevated heart rate.
2. Mobilize the upper body
Do:
- Shoulder circles, 10 each way
- Arm swings across the body, 15 reps
- Wrist circles, 10 each way
- Open and close fists, 20 reps
- Gentle forearm stretches, 15 to 20 seconds each side
3. Activate your grip lightly
Use a soft ball or simply make repeated fist squeezes for 20 to 30 easy reps. Do not fatigue yourself. This is activation, not training.
4. Do two technique reminders before rolling off
Tell yourself:
- Light hands, heavy feet.
- Exhale in technical sections.
That sounds simple because it is. It also works.
Training Off the Bike
You need enough fitness to keep technique from collapsing when you are tired. The goal is not giant forearms. The goal is better endurance, better recovery, and less panic tension.
1. Build aerobic fitness
A bigger aerobic base helps everything: recovery between efforts, breathing control, and overall relaxation. Do 2 to 4 weekly sessions of 30 to 60 minutes at an easy to moderate pace. Running, cycling, rowing, or steep hiking all work.
2. Add short hard intervals
Hard enduro demands bursts. Once or twice per week, do intervals such as:
- 6 to 10 rounds of 30 seconds hard / 90 seconds easy
- or 5 to 8 rounds of 2 minutes hard / 2 minutes easy
This teaches you to recover while still moving, which matters in a race or long technical loop.
3. Strengthen posture and pulling muscles
Weak upper back and trunk muscles make you collapse onto the bars. Focus on:
- Rows
- Pull-ups or assisted pull-ups
- Deadlifts or kettlebell hinges
- Farmer carries
- Planks and side planks
Train these 2 times per week with good form. You do not need bodybuilding volume. You need durable posture.
4. Train forearm endurance, not just crush grip
Heavy grippers alone are not the answer. Better options are timed hangs, light wrist roller work, controlled carries, and repeat efforts that build endurance without wrecking your elbows.
A simple circuit once or twice a week:
- Dead hang: 20 to 40 seconds
- Farmer carry: 30 to 45 seconds
- Wrist extension with light dumbbell: 15 reps
- Wrist flexion with light dumbbell: 15 reps
- Rest 60 seconds
- Repeat 3 rounds
Keep it submaximal. If your forearms are blown for days, you overdid it.
5. Improve mobility where it counts
Tight chest, stiff thoracic spine, and limited wrist mobility push load into the wrong places. Spend 5 to 10 minutes after training on:
- Chest stretch
- Lat stretch
- Thoracic rotation
- Wrist flexor and extensor stretch
What To Do During the Ride When Arm Pump Starts
Even with good habits, you may still feel it building. Do not wait until your fingers barely work.
1. Back off before you explode
Drop intensity for one minute. Sit where safe, loosen your grip, and ride at 80 percent. A small reset early can save the rest of the ride.
2. Shake one hand at a time on easy terrain
Only when safe, briefly loosen one hand, shake it out, then switch. Keep your eyes up and choose your moment. This is not for rock gardens.
3. Reset your breathing
Take one deep inhale and a long exhale. Then return to a normal rhythm. The long exhale is the important part.
4. Use your legs again
If your forearms are loading up, your lower body is probably doing too little. Stand correctly, weight the pegs, and support yourself with your feet.
5. Stop clenching between obstacles
A lot of riders survive the hard part, then stay tense on the easy part. That wastes recovery time you desperately need.
Hydration, Fuel, and Recovery
Fatigue makes tension worse. Dehydration and low energy make it worse again.
Before longer rides, drink enough that you start hydrated. During rides, sip regularly instead of waiting until you are thirsty. Eat simple carbohydrates on longer days so your energy does not crash. After the ride, rehydrate, eat protein and carbs, and do a few minutes of easy forearm stretching and shoulder movement. Recovery affects tomorrow's arm pump too.
Common Mistakes
- Gripping the bars as if the bike is trying to escape from you
- Riding with straight arms and locked shoulders
- Setting levers too high because it looks fast in photos
- Ignoring a harsh front end and blaming only fitness
- Using your hands to hold your whole body weight on descents
- Forgetting to breathe in technical sections
- Training only crush grip with hand grippers
- Going straight into hard terrain with no warm-up
- Attacking every section at maximum effort instead of pacing
- Sitting too much in rough terrain and taking every hit through the bars
- Waiting too long to reset once forearms start tightening
- Making huge setup changes all at once instead of changing one thing and testing it
A Simple 4-Week Plan You Can Follow
Week 1: Setup and awareness
- Adjust levers and bar position
- Check sag and basic suspension settings
- Do the pre-ride warm-up every ride
- During every ride, run the check: light hands, heavy feet, breathe
Week 2: Technique focus
- Ride one session at reduced pace just to work on relaxed grip
- Practice standing neutral and weighting the pegs
- On easy terrain, deliberately loosen your hands often
Week 3: Add conditioning
- 2 aerobic sessions
- 1 interval session
- 2 strength sessions with rows, carries, core, and light forearm endurance
Week 4: Put it together
- Ride one longer technical session
- Focus on pacing early
- Use breathing resets before difficult sections
- Note when arm pump appears and what triggered it
Then repeat the cycle and refine what you learned.
What Good Looks Like
You do not finish a hard ride with perfectly fresh hands. That is not the standard. What you want is this: your hands stay functional, your fingers keep working, and your forearms feel loaded but not seized. You can still feather the clutch, cover the brake, and make decisions instead of just surviving.
The right feeling on the bike is calm pressure, not panic tension. Your feet feel connected to the pegs, your legs support you, your shoulders stay low, and your grip stays light enough that the bike can move underneath you. When you get this right, the trail stops feeling like a fight and starts feeling manageable, even when it is hard.
Keep Reading


Join the Enduro University community
Create a free account to comment on this article, make race predictions, play daily trivia, build your virtual garage, enter the photo contest and climb the leaderboards.
Related Stories



Comments (0)
Be the first to comment.