The 20-Hour Service: A Complete Home Maintenance Walkthrough
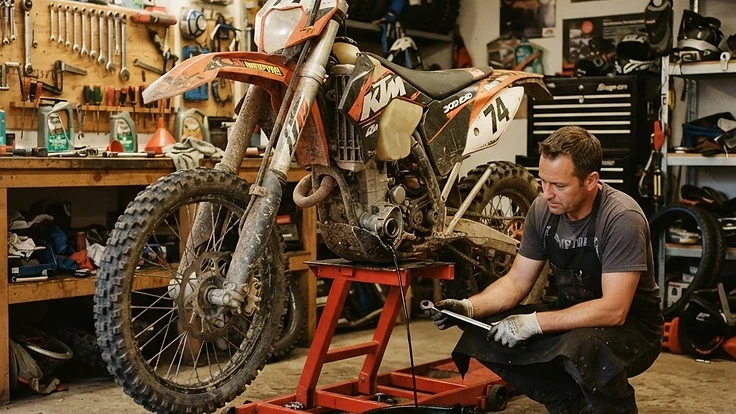
A full, practical home service guide for modern enduro bikes, covering the checks and maintenance most riders should do around every 20 hours.
The 20-Hour Service: A Complete Home Maintenance Walkthrough
A hard-ridden enduro bike can feel fine right up until one small neglected part turns into a big problem. The 20-hour service is where you reset the bike, catch wear early, and make sure the next ride feels sharp instead of vague, noisy, or risky.
This walkthrough is written for the way real riders maintain bikes at home. It fits most modern enduro machines, but you still need your service manual for exact oil quantity, torque values, valve specs, and any model-specific steps.
Before You Start
Do the service on a cold, cleanable bike with good light and enough bench space to keep parts organized. If you rush this job after a ride, you will miss things, mix up bolts, or contaminate clean parts.
Before you turn a wrench, do three things:
- Check your manual for oil quantity, torque specs, filter orientation, valve-clearance intervals, and coolant type.
- Lay out parts and tools so you are not stopping mid-job with the bike half apart.
- Take photos of hose routing, cable paths, and filter orientation if it is your first time on this bike.
If you have a four-stroke, this service usually includes engine oil and filter. If you have a two-stroke, it usually means gearbox oil, air filter service, plug inspection, and a close look at drivetrain, brakes, cooling system, and chassis wear.
Tools, Parts, and Supplies
At minimum, have these ready:
- Bike stand
- Basic sockets, ratchet, extensions, Allen keys, Torx bits if your bike uses them
- Torque wrench
- Screwdrivers and picks
- Drain pan and rags
- Nitrile gloves
- Brake cleaner or contact cleaner
- Chain brush and chain lube
- Grease
- Air filter cleaner and filter oil
- Correct engine oil or gearbox oil
- New oil filter and crush washers if required
- Coolant if topping up or replacing
- Feeler gauges if checking valves
- Tire gauge and spoke wrench
- Flashlight
You do not need a huge workshop. You do need cleanliness and discipline.
Step 1: Wash the Bike Properly
Do not service a mud-covered bike. Dirt hides cracks, leaks, and loose hardware, and it falls straight into the airbox, engine, and bearings when you disassemble parts.
Put the bike on a stand. Remove the seat if your bike makes airbox access easy that way, and cover the intake opening if needed. Rinse the bike lightly first. Do not blast directly into wheel bearings, linkage seals, steering head, electrical connectors, fork seals, or the exhaust outlet.
Use a soft brush around the engine, radiator louvers, skid plate, swingarm, chain guide, calipers, and hubs. Clean the underside too. Mud packed around the countershaft area and skid plate traps moisture and makes oil leaks harder to spot.
Dry the bike with compressed air or towels. Blow water out of spoke nipples, brake hardware, the chain, and electrical areas. A dry bike is easier to inspect accurately.
Step 2: Service the Air Filter and Airbox
This is one of the biggest life-or-death jobs for the engine. A badly seated or dry air filter can dust a top end fast.
Remove the seat and filter carefully so dirt does not fall into the intake boot. Put a clean rag in the intake as soon as the filter is out. Then inspect the airbox, especially the sealing rim, corners, drain area, and the inside of the intake boot.
If the filter is dirty, wash it with proper filter cleaner or the method recommended by the filter manufacturer. Do not twist or tear the foam. Let it dry fully, then oil it evenly. The foam should be fully coated but not dripping. Work the oil through the whole filter with gloved hands.
Wipe the airbox clean. Check for sand or dust trails inside the intake boot. If you see fine dust past the filter, do not ignore it; the filter may not have been seated correctly, the grease bead may be missing, or the cage may be damaged.
Apply a light sealing grease to the filter rim if your setup uses it. Reinstall the filter squarely and double-check that it is fully seated all the way around. This is worth checking twice.
Step 3: Change the Oil and Filter
Warm oil drains better, so if the bike is cold, run it for a minute or two first, then shut it off and let it settle. Remove the skid plate if it blocks drain access. Put the drain pan in place before you remove anything.
On a four-stroke, remove the fill cap first to help the system vent. Then remove the drain bolt or bolts. Watch for screens if your bike has them. Clean the drain plug, inspect the crush washer, and check the magnetic tip for metal. A light fuzz can be normal; chunks or sharp flakes are not.
Remove and replace the oil filter. Pay attention to its orientation. Clean the filter cavity and the cover sealing surface. If the cover uses an O-ring, inspect it for nicks or flattening.
Reinstall the drain bolt and filter cover using the manual’s torque spec. Do not guess. Refill with the correct amount of oil, then start the bike briefly and check for leaks. Shut it off, let the oil settle, and recheck level by the method your bike uses, whether that is a dipstick, sight glass, or measured refill procedure.
On a two-stroke, the process is similar but usually simpler: drain the gearbox oil, inspect the drain plug for metal, reinstall with the proper washer, and refill the gearbox with the correct volume and grade.
If your bike has oil screens, clean them every time the manual calls for it. A screen packed with sealant, clutch material, or debris is information, not just dirt.
Step 4: Inspect the Valve Train if Your Schedule Calls for It
Many competition four-strokes call for valve-clearance checks around this service interval or every second 20-hour service depending on use. Tight valves rarely give much warning before hard starting shows up.
If your manual calls for a check, remove the tank and valve cover as required. Rotate the engine to top dead center on the compression stroke. Use feeler gauges to measure each valve clearance. Write the numbers down, even if they are in spec. Trends matter.
If a valve is out of spec and your bike uses shims, do not guess the correction. Measure carefully, calculate the required shim size, and recheck after adjustment. If this is outside your comfort level, stop here and hand the job to a shop. A careful valve check is better than a rushed adjustment.
Step 5: Check the Cooling System
Look over both radiators, all hoses, and the water pump area. Bent fins are common and usually not urgent, but wet staining, dried coolant residue, or a sweet smell means you need to investigate.
Remove the radiator cap only when the bike is cold. Check the coolant level and condition. It should look clean, not rusty, oily, or full of debris. Top up only with the coolant type your bike requires.
Check hose clamps for security. Make sure the radiators are straight enough that the shrouds are not stressing them. On fan-equipped bikes, spin the fan by hand and inspect the wiring for rub points.
If you ride slow, technical terrain, your cooling system works hard. A small leak that seems harmless in the garage becomes a boil-over on a long climb.
Step 6: Chain, Sprockets, and the Countershaft Area
This is where a lot of bikes tell the truth about how they have been maintained.
Clean the chain and inspect every link. Look for frozen links, hooked sprocket teeth, side-to-side tight spots, and chain guide wear. Rotate the wheel and find the tightest section of chain before adjusting slack. Set slack to your manual’s spec, not to what looks right in the garage.
Pull the front sprocket cover and clean the area around the countershaft. Mud and chain paste build up here fast. Inspect the countershaft seal area for leaks and check the sprocket fastener or retainer.
Lubricate the chain after cleaning and after the bike is dry. You want a light, even coating, not a sticky mess that collects grit.
Also inspect the chain slider on the swingarm. If it is worn thin, replace it before the chain starts eating the swingarm.
Step 7: Wheels, Tires, and Spokes
Spin each wheel and listen. The wheel should turn freely without grinding, wobble, or a pulsing brake drag that feels excessive. Grab the wheel top and bottom and check for bearing play.
Check tire condition, sidewall cuts, knob tearing, and pressure. For mousses, squeeze and assess feel; for tubes or tubeless setups, use a gauge.
Then check spoke tension by feel or tone. You are not trying to overtighten every spoke. You are looking for obviously loose ones and keeping tension even around the wheel. Tighten in small increments and work gradually. A wheel with several loose spokes will not stay true for long.
Inspect rim locks, valve stems, axle blocks, and axle nuts. If the valve stem is leaning, the tire may be creeping on the rim.
Step 8: Brakes
Brakes get ignored because they usually still work until they suddenly work badly.
Inspect pad thickness front and rear. If the pad material is getting thin, replace it now, not after the backing plate starts scoring the rotor. Check the rotor for deep grooves, blue spots from heat, or warping.
Look at brake lines for chafing and check banjo bolts and bleeders for seepage. Spin the wheels and lightly apply the brake to feel for smooth engagement.
Check fluid levels and condition. Dark fluid or a vague lever can mean it is time to bleed the system. Also inspect rear brake pedal free movement and front lever pivot condition. A dry, sticky pivot makes the controls feel worse than they should.
Step 9: Controls, Cables, and Cockpit
Your controls should move cleanly and return on their own.
Check the throttle tube for smooth snap-back at full steering lock left and right. If it drags, inspect cable routing, bar-end contact, and housing damage. Check clutch free play and the feel at the lever. On cable clutches, lubricate or replace a dry cable. On hydraulic systems, inspect fluid level and leaks.
Tighten handguards, lever perches, bar mounts, shifter pinch bolt, rear brake tip hardware, and footpeg pins. Footpegs should move freely on their pivots but without excess slop.
This is also the time to straighten a bent lever, replace a torn grip, or fix a spinning grip before it becomes a trail problem.
Step 10: Suspension, Bearings, and Chassis Fasteners
At 20 hours, you are mostly inspecting unless your conditions are especially wet or muddy.
Wipe the fork tubes and shock shaft clean. Look for oil rings, nicks, or seal weep. Compress the suspension a few times and listen for clunks. Check linkage, swingarm, and steering head for play by lifting and pushing on the bike appropriately.
Go over the major fasteners: subframe bolts, engine mounts, triple-clamp pinch bolts, brake caliper bolts, rotor bolts, disc guards, skid plate bolts, pipe or silencer mounts, and rear sprocket nuts. Use a torque wrench where it matters. You are not trying to reef everything tighter; you are confirming security.
If you often ride deep water, mud, or pressure-wash aggressively, plan periodic linkage and steering-head grease service more often than the manual suggests.
Step 11: Electrical Checks and Final Inspection
Start simple. Check the battery terminals if your bike has one, and make sure the grounds are tight. Inspect wiring near the steering head, under the tank, around the fan, and by the subframe for rub-through.
Test the kill switch, starter, map switch if fitted, and lights if your bike is road-legal. Pull the spark plug cap and make sure it is secure. On a two-stroke, inspect the spark plug while you are here and replace it if it is fouled, damaged, or old enough to be a question mark.
Finally, do one slow visual lap around the bike. Look for fresh leaks, missing clips, rubbing hoses, loose plastics, and tools you left sitting in the skid plate.
Step 12: Start-Up and Post-Service Check
Start the bike and let it idle. Do not immediately rev it hard. Watch and listen.
You want to see:
- No oil leaks from drain bolts, filter cover, or side cases
- No coolant drips
- Smooth idle
- Normal throttle response
- No chain slap from incorrect adjustment
- Normal brake feel after moving the bike and seating the pads
After a short ride around the yard or street, recheck oil level, chain slack, axle hardware, and for any fresh seepage. Some issues only show up once the bike gets warm and moves under load.
Common Mistakes
- Over-tightening drain bolts, filter covers, and small chassis bolts into soft aluminum
- Installing the oil filter backwards
- Guessing oil quantity instead of checking the manual
- Servicing the air filter but leaving dirt inside the airbox
- Not confirming the air filter is fully seated all the way around
- Adjusting chain slack at a loose section instead of the tightest spot
- Making the chain too tight, which loads countershaft bearings and suspension travel
- Pressure-washing seals, bearings, and electrical connectors directly
- Ignoring a small coolant stain or countershaft seep because the bike still runs fine
- Tightening random spokes aggressively and pulling the wheel out of true
- Forgetting to pump the brake pedal or lever after wheel work or pad checks
- Routing throttle or clutch cables badly during reassembly
- Skipping torque values on critical hardware
- Starting the bike before checking that rags are out of the intake and all tools are off the bike
- Treating metal on the drain plug as normal without looking closely at what kind of metal it is
What Good Looks Like
When you are done, the bike should feel mechanically quiet, tight, and predictable. The throttle should snap cleanly, the controls should move smoothly, the chain should run straight and quiet, the brakes should feel firm, and there should be no fresh oil or coolant anywhere.
More importantly, you should know the bike, not just own it. You should be able to point to the filter, oil, chain, brakes, cooling system, and fasteners and say exactly what condition they are in. That is the real result of a proper 20-hour service: fewer surprises, better feel on the trail, and confidence that the bike is ready to be ridden hard.
Keep Reading


Join the Enduro University community
Create a free account to comment on this article, make race predictions, play daily trivia, build your virtual garage, enter the photo contest and climb the leaderboards.
Related Stories



Comments (0)
Be the first to comment.