How to Set Tyre Pressure for Different Terrain
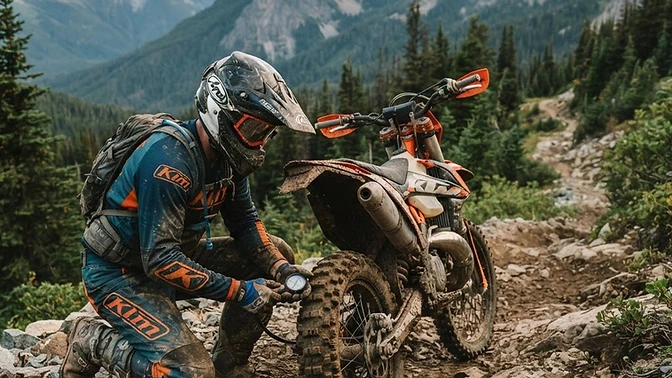
Master your traction and control by learning how to adjust your dirt bike tyre pressure for specific off-road conditions and terrain types.
Tyre pressure is the most critical, yet often overlooked, variable in your motorcycle's handling and traction. By fine-tuning your PSI to match the specific terrain, you can transform a bike that feels harsh and skittish into one that tracks with confidence. This guide will teach you how to read the ground and adjust your pressures for peak performance.
What It Is and Why It Matters
Tyre pressure management is the art of balancing the contact patch size against the risk of rim damage and pinch flats. When you lower your pressure, the tyre carcass deforms more easily, allowing the knobs to conform to the terrain, which significantly increases grip on loose, rocky, or slick surfaces. Conversely, higher pressures provide a stiffer sidewall that prevents the tyre from squirming under heavy loads or high-speed cornering, while also protecting your rims from sharp, square-edged impacts.
Understanding this balance is essential for intermediate riders because it dictates how your bike communicates with the ground. If your pressure is too high, you will bounce off obstacles rather than absorbing them; if it is too low, you risk damaging your wheels and experiencing unpredictable handling. Mastering these adjustments allows you to adapt your machine to the day's conditions, ensuring you have the best possible traction regardless of whether you are riding deep sand, slick mud, or technical rock gardens.
Step-by-Step Technique
- Establish a Baseline — Start by checking your manufacturer's recommended pressure, which is typically found in your owner's manual or on the swingarm sticker. For most enduro bikes, a standard baseline for mixed terrain is 12-14 PSI in the front and 12-13 PSI in the rear. Always use a high-quality, low-pressure digital gauge to ensure your readings are accurate, as standard car gauges are often imprecise at these low levels.
- Assess the Terrain — Before you ride, evaluate the primary surface you will be tackling for the day. Soft, loamy, or muddy conditions require lower pressures to allow the tyre to flex and clear debris, while hard-packed, rocky, or high-speed terrain requires higher pressures to prevent rim damage. If your route includes a mix of everything, aim for a middle-ground pressure that offers a compromise between grip and protection.
- Adjust for Soft or Muddy Conditions — In deep mud or soft sand, you want the tyre to float and find traction, so drop your pressure by 1-2 PSI from your baseline. This increased footprint helps the tyre stay on top of the surface rather than digging in and spinning. Be mindful that lower pressures in these conditions increase the risk of the tyre spinning on the rim, so ensure your rim locks are tightened correctly.
- Adjust for Rocky or Technical Terrain — When riding through sharp, embedded rocks, you must increase your pressure to protect your rims and inner tubes from pinch flats. Aim for 14-16 PSI in the front and rear to provide enough cushion to deflect impacts without sacrificing too much grip. If you are using heavy-duty tubes or a mousse system, you can safely run slightly lower pressures to maintain traction on technical climbs.
- Account for Rider Weight and Speed — Your body weight and riding style significantly influence how much pressure you need to run. Heavier riders or those who ride aggressively at high speeds should stay on the higher end of the recommended PSI range to prevent the tyre from bottoming out on the rim. Lighter riders can often get away with lower pressures, as they exert less force on the tyre carcass during impacts.
- Check Pressure Cold — Always measure and adjust your tyre pressure when the tyres are cold, ideally before you start your ride. As you ride, the friction and heat generated will cause the air inside the tyre to expand, naturally increasing the PSI. If you adjust your pressure while the tyres are hot, you will likely end up with an under-inflated tyre once it cools down.
- Test and Refine — After making an adjustment, head out for a short test loop to feel how the bike responds to the changes. If the bike feels harsh or deflects off small rocks, drop the pressure by 1 PSI; if it feels vague or squirmy in corners, add 1 PSI. Keep a small, portable pump or a CO2 inflator in your pack so you can make these micro-adjustments on the trail as conditions change.
2-Stroke vs 4-Stroke Differences
The primary difference in tyre pressure management between 2-stroke and 4-stroke bikes comes down to power delivery and engine braking. 2-strokes have a snappier power delivery that can cause the rear tyre to break traction more easily, often requiring slightly lower rear pressures to maximize hook-up. Conversely, 4-strokes provide more consistent, linear torque and significant engine braking, which can put more stress on the rear tyre carcass; therefore, 4-stroke riders often benefit from running 0.5 to 1 PSI higher in the rear to maintain stability and prevent the tyre from folding under heavy engine braking forces.
5 Common Mistakes (and How to Fix Them)
1. Using a standard car tyre gauge for low-pressure readings.
Invest in a dedicated low-pressure digital gauge that provides accurate readings in 0.5 PSI increments.
2. Adjusting tyre pressure while the tyres are hot after a ride.
Always check and set your pressures when the tyres are cold to ensure consistency.
3. Running the same pressure regardless of the terrain.
Carry a small pump and adjust your PSI by 1-2 PSI when moving from hard-pack to soft or rocky terrain.
4. Ignoring the condition of your rim locks.
Ensure your rim locks are tight to prevent the tyre from spinning on the rim at lower pressures.
5. Over-inflating to avoid flats at the expense of all traction.
Use heavy-duty tubes or tyre inserts if you need to run lower pressures for grip without risking pinch flats.
Practice Drill You Can Do in Your Yard
Find a small, flat section of dirt or gravel in your yard and set up two markers about 20 feet apart. Ride through this section at a consistent speed with your standard pressure, then drop your rear pressure by 2 PSI and repeat the pass. Focus on how the bike feels during acceleration and cornering, noting the difference in grip and feedback. This simple back-to-back test will help you develop a 'feel' for how pressure changes affect your bike's handling.
Motorcycle Setup & Tuning Notes
Tyre pressure works in tandem with your suspension settings; if you are running lower pressures for grip, you may need to slightly increase your compression damping to prevent the bike from feeling too wallowy. Additionally, ensure your tyre bead is properly seated on the rim, as an improperly seated tyre can cause vibrations and unpredictable handling regardless of the PSI. Always check your spoke tension, as loose spokes can lead to rim damage when running lower pressures on rocky terrain.
Frequently Asked Questions
Q: How often should I check my tyre pressure?
You should check your tyre pressure before every single ride. Air can leak slowly over time, and temperature fluctuations will change your PSI significantly.
Q: What is the lowest PSI I can safely run?
With standard tubes, avoid going below 12 PSI to prevent pinch flats. If you use mousses or tubeless systems, you can effectively run much lower pressures, sometimes as low as 6-8 PSI for extreme technical terrain.
Q: Does the sidewall maximum pressure matter for off-road?
No, the maximum pressure listed on the sidewall is a safety limit for the tyre's construction, not a recommendation. Never inflate to that number, as it will make your bike handle poorly and provide zero traction.
Q: Should I run different pressures in the front and rear?
Yes, the front and rear tyres serve different purposes. The front tyre is for steering and braking, while the rear is for drive, so it is common to run slightly different pressures to balance grip and stability.
Relevant Bike
Husqvarna FE 350Track your progress and join the community
Create a free account to save the technique guides you've mastered, make race predictions, play trivia, and connect with enduro riders worldwide.